Glinda Altered Embroidery Hoop [with a small tutorial]
Today's I am sharing a project!
I have loved The Wizard of Oz since
I was little! Not long after I got into
paper crafting [2005 was when I stared]
I saw this paper stack at Michaels.
I though it was gorgeous!
It had glitter, and was Wizard of Oz themed.
SO I bought it... and never used it,
until this year! I used quite a bit from my stash!
A little magic wand, some Webster Pages trims,
that I love, a spray of paper flowers that I got from
Michaels FOREVER ago, and this paper!
Featuring Glinda the good witch!
This is the first of a series of these types of hoops,
using this paper stack.
I was not in-love with it at first, and had no idea
of what this and that I was going to use, but once
things starting coming together I was very pleased!
I decided to throw together a small tutorial.
I know there are alot around BUT I thought I would
try and share my process.
Supplies:
9 1/2 inch embroidery hoop.
Canvas [can be bought in the fabric section of stores usually].
Pretty paper of your choice [at least 10x10 inches in size].
Paint.
Matte Gel or Modpodge [or whatever it is you decoupage with]
Hot glue gun and glue sticks.
Quick drying glue
Sequins
Trims and ribbons of your choice.
Embellishments as many and whatever kind make your heart smile.
Here are a few of my supplies before I began constructing my project. Aren't they pretty?! I try and collect whatever I might want to use before beginning a project. I find this cuts down on the stress and makes the creating process so much easier.

The first thing you will want to do place the hoop over the part your pretty paper that you want featured on your project.
Trace around the outer edge of your hoop.
Then cut out what you traced, for this project it was a circle shape.
Next step for this project was separating and then painting the hoop parts, letting them dry completely.
After that you will to cut your canvas to fit in between your hoop parts.
Leaving an inch or so extra.
Once that is done, you will want to place the canvas fabric in between the two hoops.
Tightening the screw thingie at the top of the hoop.
Making sure it as tight as can be.
Make sure your canvas is taught, and there are no wrinkles.
This is what my project looked like after all of that.
I also painted on my paper, I wanted it to match my canvas and hoop.
You can do what you like though.

I then took my decoupage medium and a paint brush and brushed my medium onto the canvas.
Then added some to the back of my cut out paper and put the paper on top adhering them together.
I use a small brayer to make sure there are no lumps or bubbles in the paper.
I usually add a top coat to seal it all.
Then let it dry completely.
The next step is one of my favorite steps of the whole process!
Deciding what embellishments stayed and what had to go back in my supply stash!
I love looking at all the pretty things! So much!

Once I had settled on some pretty things I placed them on the project using my fine tipped glue gun and some hot glue.
I ALWAYS place trim around the outside edge of the hoop.
It's pretty and it hides where you cut the canvas!
The next pic was taken during mid project. I loved the direction
this was going!
Next I wanted flowers. I was stumped!
Thankfully I found this little sprig of flowers in my craft horde. Pretty sure I got them on clearance at Michaels YEARS ago!
They were just what I needed!

I did some altering to the flower sprig, then glued them down using my hot glue.
I was pretty pleased with the progress.
The next thing I decided to add was some star sequins!
I also wanted an inspirational quote, one from the Wizard of Oz would have to be a thing!
So I did a little googling, and found the perfect quote from the movie!
I went into my electronic cutting machine program, typed out the quote and then printed and cut it out on vellum paper using my electronic cutter.
I adhered it down to the canvas using my fave glue and then glued a few star sequins to the vellum.

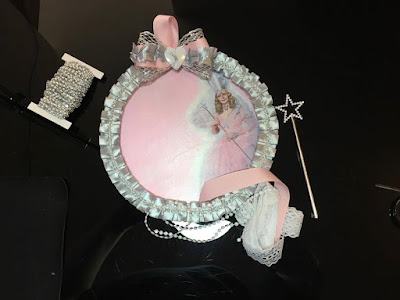
This is what I had when the whole process was done.
I honestly loved it [hopefully you like it too] and it made me feel good to be creating and using my craft stash!
Below are a few more pics of the finished project.


I hope this tutorial was easy to understand!
In closing I just wanted to note that I always thank God for everything good in my life.
I don't plan out my projects much, so I know He helps me!
If not for Him I would be no good, do no good, and it would not be possible for me to make pretty things.
That is how I see it anyways!
I hope whoever views this loves it and is inspired!
Much love!!
💖 - Dezz
I have loved The Wizard of Oz since
I was little! Not long after I got into
paper crafting [2005 was when I stared]
I saw this paper stack at Michaels.
I though it was gorgeous!
It had glitter, and was Wizard of Oz themed.
SO I bought it... and never used it,
until this year! I used quite a bit from my stash!
A little magic wand, some Webster Pages trims,
that I love, a spray of paper flowers that I got from
Michaels FOREVER ago, and this paper!
Featuring Glinda the good witch!
This is the first of a series of these types of hoops,
using this paper stack.
I was not in-love with it at first, and had no idea
of what this and that I was going to use, but once
things starting coming together I was very pleased!
I decided to throw together a small tutorial.
I know there are alot around BUT I thought I would
try and share my process.
Supplies:
9 1/2 inch embroidery hoop.
Canvas [can be bought in the fabric section of stores usually].
Pretty paper of your choice [at least 10x10 inches in size].
Paint.
Matte Gel or Modpodge [or whatever it is you decoupage with]
Hot glue gun and glue sticks.
Quick drying glue
Sequins
Trims and ribbons of your choice.
Embellishments as many and whatever kind make your heart smile.
Here are a few of my supplies before I began constructing my project. Aren't they pretty?! I try and collect whatever I might want to use before beginning a project. I find this cuts down on the stress and makes the creating process so much easier.

The first thing you will want to do place the hoop over the part your pretty paper that you want featured on your project.
Trace around the outer edge of your hoop.
Then cut out what you traced, for this project it was a circle shape.
Next step for this project was separating and then painting the hoop parts, letting them dry completely.
After that you will to cut your canvas to fit in between your hoop parts.
Leaving an inch or so extra.
Once that is done, you will want to place the canvas fabric in between the two hoops.
Tightening the screw thingie at the top of the hoop.
Making sure it as tight as can be.
Make sure your canvas is taught, and there are no wrinkles.
This is what my project looked like after all of that.
I also painted on my paper, I wanted it to match my canvas and hoop.
You can do what you like though.

I then took my decoupage medium and a paint brush and brushed my medium onto the canvas.
Then added some to the back of my cut out paper and put the paper on top adhering them together.
I use a small brayer to make sure there are no lumps or bubbles in the paper.
I usually add a top coat to seal it all.
Then let it dry completely.
The next step is one of my favorite steps of the whole process!
Deciding what embellishments stayed and what had to go back in my supply stash!
I love looking at all the pretty things! So much!

Once I had settled on some pretty things I placed them on the project using my fine tipped glue gun and some hot glue.
I ALWAYS place trim around the outside edge of the hoop.
It's pretty and it hides where you cut the canvas!
The next pic was taken during mid project. I loved the direction
this was going!

Next I wanted flowers. I was stumped!
Thankfully I found this little sprig of flowers in my craft horde. Pretty sure I got them on clearance at Michaels YEARS ago!
They were just what I needed!

I did some altering to the flower sprig, then glued them down using my hot glue.
I was pretty pleased with the progress.
The next thing I decided to add was some star sequins!
I also wanted an inspirational quote, one from the Wizard of Oz would have to be a thing!
So I did a little googling, and found the perfect quote from the movie!
I went into my electronic cutting machine program, typed out the quote and then printed and cut it out on vellum paper using my electronic cutter.
I adhered it down to the canvas using my fave glue and then glued a few star sequins to the vellum.

This is what I had when the whole process was done.
I honestly loved it [hopefully you like it too] and it made me feel good to be creating and using my craft stash!
Below are a few more pics of the finished project.


I hope this tutorial was easy to understand!
In closing I just wanted to note that I always thank God for everything good in my life.
I don't plan out my projects much, so I know He helps me!
If not for Him I would be no good, do no good, and it would not be possible for me to make pretty things.
That is how I see it anyways!
I hope whoever views this loves it and is inspired!
Much love!!
💖 - Dezz


Desiree this is a lovely idea. It turned out nice. Good workmanship. Good use of items you already have.
ReplyDeleteI appreciate your honesty and sharing about God's blessing in your crafting. I am the same. I know that the gift comes from God. When the project turn out and the ideas are flowing, I know it's God inspiring and blessing me.
(sorry this is is so late, i thought that i did comment.)
Awwwe! Sorry I am so late in responding! That means SO much! Thank you for your thoughtful comment! <3
DeleteI try to stay humble. I believe NOTHING good is possible without God Almighty! So I often thank Him for every good thing in my life, my loved one's lives and in the world! From the smallest need that He meets, to the highest blessing, Jesus! Whatever gifts or talents He has given me is in there somewhere! So are blessings like you friend! Much love in Christ!